
Aviaries, Cages, Nestboxes, Perches, Toys, Transport cages and Brooders/Hospital cages
Aviaries for Lories and Lorikeets
The best home for a lory is without doubt some type of outside aviary. Large
enough for the lory to exercise by flying more than just short distances. This
usually means an aviary at least four metres in length with clear flying space
from end to end. Usually located in a garden such an aviary will be exposed to
the elements and the lory will experience sunshine, wind and rain.
There will need to be some sheltered area
in the aviary where the lory can escape the harshest extremes of the weather
and it is usual to provide a nestbox apart from perches located in the
sheltered area.
Normally one end of the aviary will be covered over and somewhere there
will need to be an extrance door. The aviary will often be designed with a
double door entrance area to minimise the risk of a bird escaping.
An ideal larger aviary is not always possible and some compromises may need to
be made resulting in a smaller aviary, suspended aviary or using some sort
of cage, large or small.
It has been suggested that the smallest practical aviary for a lory would be
about 2 metres long by 1.8 metres high by 0.9 metre wide. This will still
allow the lory to fly but only a metre or so.
Aviary materials/building
Aviaries can be constructed from a variety of materials. Many find that
wood for framing is easy to work with and using standard 45mm to 55mm square
treated fence rails is quite common in aviary construction. Since these
normally come in 2.4metre lengths it is not too difficult to minimise
cutting by designing the aviary to be 2.4metres long and 1.2metres wide
by 1.8 to 2metres high. Sheets of 7mm plywood also come in standard sizes of
1.2metres wide by 2.4metres long so again with minimum cutting these can be
used.
Galvanised 20mm, 25mm and 30mm square wire is available in 30metre rolls
and either 915mm wide or 1215mm wide. This wire is ideal for aviary
construction.
Painting an aviary
There are differing views about this but apart from the obvious advantage
of preserving bare wood some say that painting creates a more visually
pleasing aviary (ie looks nice!) and that by painting aviary wire black the
enclosed bird's plumage will be more visible and colourful.
If the wood aviary frame is made from treated wood then painting could keep
the birds away from peeling and sucking the wood and perhaps consuming some
of the treatment chemicals.
One good reason for painting galvanised wire is that it will be less
likely to oxidise creating that white zinc oxide powder that some birds
seem prone to licking (with resultant poisoning).
Non-toxic paint must be used, most modern outside roof paints are non toxic
and non-metallic based, paints designed for where children come in contact
with them on toys are also non-toxic. Make doubly sure about paint before
using it as birds will definitely pull at peeling and loose flecks of paint.
Also for this reason painted surfaces should be checked and touched up
where necessary.
Constructing an average size aviary
Here is an example for constructing an average single garden aviary, sizes
have been calculated to minimise the cutting of wood and to use standard
materials wherever possible.
It is assumed the final location for the aviary has been prepared and is
flat, well drained and in a semi shaded position, away from severe winds
and stormy weather. The front of the aviary should, if possible, be towards
the sun during the day - in southern hemisphere this means pointing
approximately northwards.
Of all the materials listed below the roll of wire should be obtained, if
possible, several weeks before construction begins. It should be left in the
garden where it can be rained on to allow the zinc plating to oxidise and
weather down. Hosing it down several times in hot weather and also scrubbing
with a weak vinegar in water solution will help seal and oxidise the clean
zinc and remove any flaking, cracked, or spikes/feathers of zinc left from
the hot zinc dipping process when the wire was manufactured.
Materials needed are:
ten 2.4 metre lengths of nominal 50mm square fence rails,
three sheets of 7mm plywood - each sheet 2.4 metres long by 1.2 metres wide,
one 30metre roll of galvanised 18mm, 20mm, or 25mm square section welded wire,
915mm wide -the larger 1215mm wide wire can be used but then many meaurements
given below would have to be altered so that the wire would not need to be
excessively cut to size (and a lot of offcutts wasted!).
Box of 100mm jolt head nails, box of 25mm flat head gib board nails,
wire staples or staple gun with suitable staples,
tools needed are claw hammer, electric drill and 3mm to 6mm bits, saw -
preferabley an electric circular saw, 4 metre or longer tape measure, straight
edge at least 2 metres long, pencils/markers,
screwdrivers/screwdriver bits for drill and cutters/pliers for galvanised
wire.
FLoors:
Concrete - easy to clean by simply hosing down, need drainage slot or exit,
Stone, scoria - again easy to clean by hosing, may need drainage below,
Natural, grass/weeds on soil/dirt floor
- very natural but can turn to mud in wet weather, also birds may
grovel and eat worms or other parasites. Weeds and benefical food plants,
eg dandelions, puha etc can be encouraged to grow, birds will enjoy a good
grovel!.
Incorporating a few paving stones in the dirt floor avaiary will lessen
problems (for humans) when the ground gets wet and soggy,
Woodbark, often used as a weed suppressing cover in gardens, sometimes on top
of black plastic. This will eventually will rot down and can just have more
added on top, weeds and greenery will also eventually grow through it.
Birds seem to enjoy playing on woodbark.
Roof cladding
The need for some type of roof cladding or covering will depend on the aviary
design and its location. Usually most wood constructed aviaries will not be completely waterproof and it may be necessary to use some roofing cover such as
plastic or metal corrugated sheets and perhaps appropriate drainage guttering
and spouting.
With a sloped roof design aviary, where the covered area is roofed with
wood (plywood or other wood sheet etc..) it may be sufficient to seal joints,
cover joins with metal weatherproof edgings and cover with a few coats of
paint. With near flat roofed aviaries the simple method may be to use
some corrugated sheeting.
It should not be necessary to completely roof over an aviary as lories will
enjoy rain showers especially after a dry period. Leaving an area of a wired
over aviary roof open to the elements will suffice.
An excellent idea. The main problem is that lories tend to be vary hard on
plants and can soon reduce them to a dead stripped stalk or two.
If the aviary is large enough to allow a tree/bush or two to be incorporated,
at aviary construction time or planting later, then this will provide a quite
natural setting for the birds. Newly planted shrubs will often need to be
wire prtected for some time until they are established and getting quite large.
Smaller potted plants can be introduced and the lories allowed to feed and
strip them. Hanging put plants of the non-succulent types including flowering
plants and ferns will prove quite popular.
With the concrete or stone covered aiary floor the use of large plastic tubs
may be necessary for introducing plants.
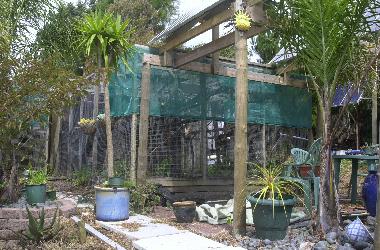
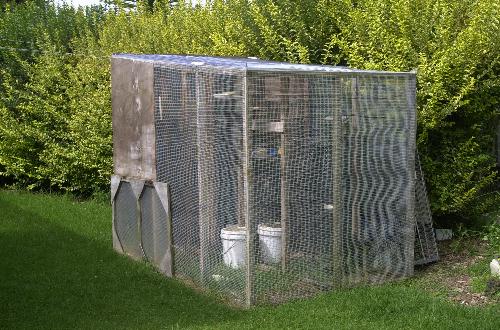
Some examples of aviaries, all home-built on site to suit the available space and number of birds are shown below.
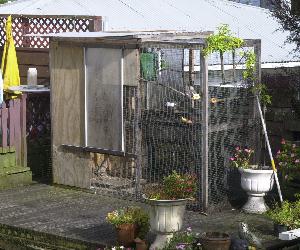
A small garden Aviary. |
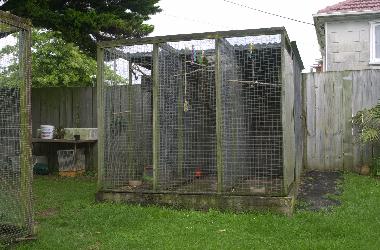
Three large 6metre Aviaries |
A neat setting of three aviaries. |
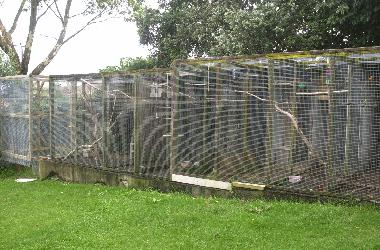
Array of 8 aviaries being expanded. |
A double aviary with one entrance and secure area with doors into each aviary. |
New Pre-built aviaries
Where time and/or labour skills are not available to construct an aviary then
purchasing a pre-built avaiary may be a convenient and quick option. Many
sizes and designs are normally available and obviously the larger ones are
more expensive. Selecting an aviary and seeing what is generally available
may mean visiting a few of the larger pet stores specialising in pet
birds.
These are nearly always intended for outside location in a garden or on
a deck. Most will be constructed of wood, plywood and galvanised welded wire
and are available in various sizes and designs.
These are ideal where there is only a few birds, perhaps
one or two breeding pairs in the smaller double aviaries.
The only disadantage with a new pre-built avairy is that you are limited to
what is available unless you are prepared to pay extra to have a custom
design constructed.
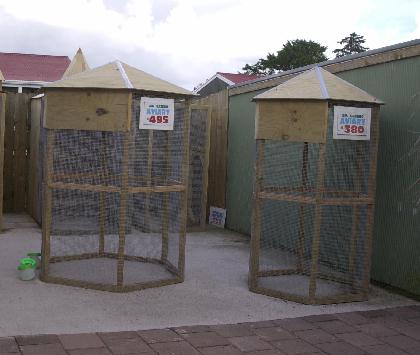
One such supplier (and manufacturer) in Auckland, NZ, is the Bird
Barn (Lincoln Road, Henderson, Auckland) and pictured below are two small
octagonal aviaries and a larger retangualr type with plywood sloped roof area
at rear.
Suppliers of metal framed aviaries such as
Millenium Aviaries NZ
supply a range of standard sized aviaries manufacted with metal framing, in
kitset form. They will also build customer designed aviaries and cages.
Metal aviaries tend to be more expensive but are easy to extend as many are
of a modular design permitting various shape and size options in the final
product.
Pre-built small aviaries. |
Larger double aviary. |
Second-hand aviaries
Apart from a new avairy there always seems to be a selection of second-hand
ones available and advertised in local newspapers (and Trade & Exchange).
Some pet stores will have notice board ads where avaries may be advertised and
they may actually have used aviaries for sale.
Such aviaries tend to be under 50% of the new avaiary price but
transportng it to your location may be an issue as pet stores can often deliver a new
aviary whereas a private purchase may mean organising delivery - the cost
of which could be substantial so needs to be accounted for when deciding
what to pay for the second-hand aviary.
There are also several other issues apart from price and delivery that should
be addresed.
Inspect the aviary frame and wire, making
sure all is secure and in good condition. Doors, hinges and handles/locks
need to be working, watch for sticking twisted doors and look for gaps/holes
around doors and frames. Check wire is not rusted or has loose zinc
galvanising as this could mean replacing wire. If the wood frame is
painted then make sure there is no rot hidden by paint, especially if the
aviary has just been freshly painted. Look for insect infestation such as
ant nests, weevils, wasps etc. these can indicate problem areas such as
nooks and crevices which could become reinfested.
After purchasing a second-hand aviary everything should be scrubbed clean with
disinfectant including nestboxes, perches, shelves, toys and any other
accessories provided. The aviary walls, roofing and wire needs great care
in cleaning to remove all traces of previous occupants feathers and fragments,
excrement and food stains/spoiled food stuck in crevices etc..
Try to find out as much as possible about the previous occupants, if they
died from disease, what was it? The seller may not want to admit to this but
you must assume the worst and clean accordingly - just imagine if the previous
birds died from PBFD (Beak and Feather disease), you will certainly take
cleaning very seriously.
Unless nestboxes are in very good general condition and can be thoroughly
cleaned it may not be a good idea to take them. These are where disease is
likely to be introduced, everything from bacterial and fungal problems (which
a good disinfecting will definitely remove) to horrors such as Polyoma Virus
and Beak and Feather Virus which are just not so easy to eradicate.
Old nestboxes, perches and other aviary furniture should normally be discarded
and if possible burnt.
Cages for Lories and Lorikeets
If an indoor or outdoor aviary is not an option for housing a lory then a cage
of some type is second best.
Birds in cages MUST be kept indoors as
a cage will not offer sufficient protection from the elements and will
certainly not have enough room inside for a nestbox.
The cage should be located in a draught free location and not be placed in an
area where it can become excessively hot or cold, or too close to a fireplace,
heater or in direct sunshine. Fumes from heaters and the kitchen should also
be avoided and certainly anyone who smokes should keep the bird well away
from tobacco smoke.
Of course in fine weather the caged bird may appreciate being outside on a
deck or in the garden for a while. The change in surroundings will be a new
exciting experience for the bird.
The larger the cage the better as there is nothing
worse than a lory or lorikeet confined a small space. The smaller cages
designed for budgies, finches and similar sized birds are generally not
suitable for any lory since they will have way too little space for the lory
to move around. Such cages may be ideal as a temporary home for a day or so
or for transporting a bird but as a permanent home are just not suitable
The most popular cages for a lory or two is the size shown in the centre photo
below. These are about 600mm high by 450mm square and cost (in NZ$) from
$90 upwards to $200 depending on the design, finish and actual size.
They usually come with one
or two wood dowel type perches, two plastic food/water dishes that clip in the cage
bars and a plastic removeable base tray. Entry to the cage will normally be
via two hinged up panels on the cage top as well as the normal door on the
front side of the cage. There is often two smaller doors of slide up panels
where the plastic cups are located so that food and water can be easily
placed. One point worth noting here is that the intelligent lory can often
learn to lift these panels and make an exit, sometimes even when they are
held closed with a clothespeg. Wiring closed with thin wire (fuse wire) and
using plastic cable ties is more secure.
By far the best type of cage for a lory is the metal constructed welded bars
type which generally come in minimum appromimate sizes of a metre wide, 450mm
deep and 700mm high. They often have a slide out metal tray in the base and can
be supplied with supporting legs (see example in photo below right).
These type of cage can cost (in NZ$) from several hundred dollars to well
over one thousand dollars and range in finishes from powder paint coatings
to chrome or bright stainless steel.
With all of these cages there is always the problem of cleaning since the
lory squirts liquid poo (because of its largely liquid nectar based diet).
Unless there is some sort of protective covering this poo will quickly soil
the immediate area where the cage is located. To minimise this problem the
lower sides of the cage can be covered with plastic or glass sheeting. If the
cage is placed next to a wall then an old sheet, towel, curtains or even
newspapers can be hung to protect the wall. The same applies to nearby
furniture, carpets and other items that need to be protected and often some
creative thinking is necessary to try and overcome this squirt problem since
a lory can often squirt as far as a metre.
In general no matter what size cage is used the lory will not be able to get
any meaningful flying exercise. Therefore any
caged lory should be taken out of its cage for an hour or more per day for
playing and exercising in a larger confined space - ie room with closed door
and windows such as a sunroom or a garage.
Playtime with its adopted human is very important for a single lory, it will
consider itself part of the human family and as such expect attention and to
participate (by playing) in family activity.
The risk of boredom is much higher with a cage confined bird so it becomes
very important to have as large a cage as possible and include a variety of
toys. There should be sufficient toys and activity items without cluttering
the cage. Changing toys from time to time keeps the lory interested and
introducing the occasional new toy becomes a major investigation activity
for the lory.
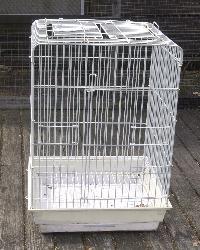
Pictured below are several cages, the leftmost is barely big enough for one
lory, the centre one is ok for one lory and just about big enough for a non
breeding pair. Birds kept in either of these would need daily or more
frequent sessions outside their cages.
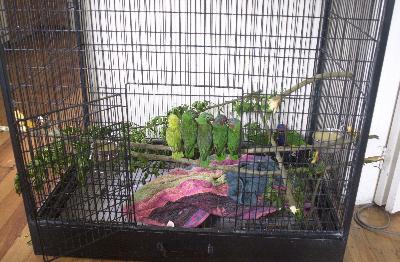
The righmost cage shown is much larger and in this case was used to house
young lorikeets just getting ready to fledge. Five can be seem in a line on
the perch (Musk and Scaly lorikeets) with Red-collared lorikeets at the
bottom right of the cage. Such a cage is the best option for caged lories
and suitable for a breeding pair.
Almost too small lorikeet cage |
Better 1 or 2 lorikeet cage |
Large lorikeet cage |
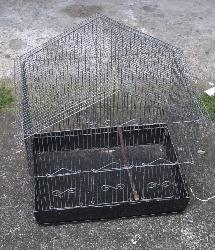
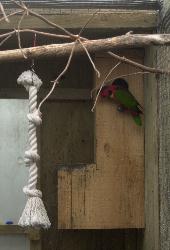
Nestboxes
Nestboxes serve two main purposes, somewhere for the lories to seek shelter
in the worst weather conditions, and somewhere for the hen to lay and incubate
eggs then raise the young birds until they fledge. Bonded pairs of lories will
usually sleep in the nestbox instead of staying on a perch overnight.
A nestbox needs to be of aedquate size for the particular birds, with an
entrance hole of suitable size and contain suitable nesting material that
will remain dry. It should be located in the avairy so that it is protected from
rain, be at an acceptable height for the lories and be easily accessible. There
will normally be a short perch or platform below the entrance hole and this
will also extend inside the nestbox so that the bird can peek outside before
making an exit. Most vertical designs will have steps or wire on the inside
to allow the lory to climb down to the actual nest chamber.
There are many different designs of nestbox that try to take into account the
needs of paticular types and sizes of lory. Other factors such as protecting
eggs from accidental breakage - perhaps by a bird dropping on top of them or
an excited male stomping them - may be considered in the design.
The nestbox should
also be easy for a human to look into and check on eggs and birds.
This will mean some type of inspection door or removable panel.
Low cost nestboxes tend to have a simple hinged lid or a removable lid, these
can be very inconvenient if placed high in an aviary as a ladder may be needed
to look inside. Side entry doors or hatches and hinge down front panels are more
convenient.
Just about all nestboxes are constructed from wood and use sawdust and/or
wood shavings as nesting material.
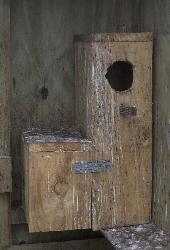
The images below show some typical designs for lory nestboxes. Most can be
made by the aviculturist but for convenience they are often purchased from
a pet supply store.
The most common nesting material is sawdust or wood shavings. These should be
from untreated wood and dry when placed in the nestbox. With a breeding pair
of lories who successfully hatch and raise young the nesting material needs to
be inspected often while there are young in the nestbox. The young will
soil in the nestbox and the nesting material can quickly become a soggy
mess, this in turn can make the young cold and risk their survival. Nestboxes
should have several drainage holes beneath the nesting area to allow excess
water to drain away.
Nesting material should be changed ocassionally although probably not if there
are very young birds in the nest as this change may upset the parents and could
result in the young being abandoned or worse, being killed.
Usually there is no option but to purchase wood shavings or sawdust from a pet
store but often sawmills and manufacturers using wood will be glad to have
sawdust removed and may package it into large plastic bags or allow it to be
collected. This may need to be dried before use but is still worth the
inconvenience considering the money saved. If there is enough free sawdust
available then it is also excellent to spread on concrete aviary floors.
Easy hinged lid nestbox
The most simple is just a rectangular box with an opening lid, or
opening front panel. To minimise wood cutting and fitting, a length of
standard 250mm (10 inch) wide 20mm thick untreated boxwood is used.
A small piece or galvanised wire mesh is needed and a short, about 120mm
(4 inch) piece of branchwood about 10mm (3/8 inch) in diameter. This will be
used as a perch below the endtrance hole. About 18 by 40mm long No5 screws
for particle board are needed.
Cut the boxwood into the following lengths:
Two of 350mm, two of 370mm, two of 290mm.
The base is one of the 290mm sections. Place it on a flat surface. On top of
this the four longer sections will be placed, one along each top edge of the
base. Start with the 250mm wide ends of the base and place on each an upright
350mm section. Then one the 290mm edges place the two upright 370mm sections
to form an enclosed box. Drill holes and use the 40mm screws to join all
sections.
Now about a third way down in the centre of one of the 350mm
sections drill a pilot hole then usinga hole-cutter make a 50mm (2 inch)
diameter hole. About 30mm below the lower edge of the hole make another
hole through which the perch can be tightly pushed. About 50mm of the perch
should protrude both inside and outside the box. Where the perch protrudes
inside the box staple a length of wire mesh just below the perch almost to
the bottom of the box. Bend the wire out from the wood slightly so that the
birds can use the wire to climb up to the perch and entrance hole.
If it is easier to do then the entrance hole and mesh stapling can be completed before the box is assembled.
Last is the lid. This should fit over the top of the two 250mm upright
sections (front and back of the nestbox) and between the two sides which should
be prtruding up by 20mm above the height of the front and back. With the lid in place a hole should be drilled either side at the back top corner of each side
panel and screws used to through each side into the rear side edges of the
lid. Do not tighten the screws too much as they are the hinges that allow the
lid to open and close. It may be necessary to bevel the back lower edge of the
lid to allow it to open and close easily.
In the base of the nestbox drill six to eight 8mm to 10mm holes to allow
liquid to drain from inside the box.
Last place about 30mm depth of dry untreated sawdust/wood shvings in the
bottom of the box. It is now ready to be mounted in an avairy for use. It
should be placed in such a way to allow the lid to be opened so that the
contents can be inspected. It is not necessary to paint the nestbox.
A simple variation on the above design is to have the top part of the front
panel hing outwards and downwards instead of having a hinged lift up lid.
Before assembling the box with the front panel in place, this is one of the
350mm sections, cut it into a 200mm and a 150mm pieces. Make the entrance hole
in the centre of the 150mm section with perch hole below it. Assemble the
box screwing the 200mm section in place. The lid should be screwed down from
the top into back section top edge and through the upper sides of the side
sections into the side edges of the top.
The section of the front with the entrance hole should now be placed in
position and a 60mm to 75mm hinge connected to the outside to enable this
section to hinge outwards and downwards.
A small wood lever, metal catch/bar or even a loosely fitting nail through
one of the side panels into the upper left or right edge of the hinging
section can prevent it falling open.
With this design the nestbox can be placed even higher in the aviary and
inspecting inside may be more convenient.
The images below, second and third from the left show a hinged top nestbox and
a hinged upper-front panel nestbox
Slightly more complicated but still easy to make. Adjust dimensions to suit
height needed.
Apart from the different shape the main advantage of this design is that the
egg chamber is not directly below the entrance hole and a bird coming into
the box is very unlikely to drop down and break eggs. A removable inspection
lid can be made over the lower part of the 'L' making it quite easy to see
directly into the egg chamber.
Again using 250mm wide by 25mm thick untreated boxwood cut the following
lengths:
one 500mm base,
one 650mm the end filler between the long end of the 'L',
one 225mm the end filler at the short end of the 'L',
two 700mm and two 250mm which make the front and back of the 'L' shape,
one 450mm filler for the inside of the 'L',
one 300mm top,
one 300mm which is the removable lid plus one narrow offcut about 100mm.
Place the 500mm base on a flat work surface.
Assemble on one 500mm edge of the base a 700m upright and to the left
of this a 250mm upright. Two screws through these into the edge of the base
should secure them. Repeat on the back edge of the base so that the 700mm
uprights are facing each other.
Now at the rightmost top edge of the base, between the two 700mm uprights
place the 650mm upright. This will need to be secured with a screw up through
the bottom of the base in to its lower edge and two screws through each 700mm
upright into the vertical edges of the 650mm upright.
Now at the left end of the base place the 225mm section between the two 250mm
uprights and again secure with screws, one up through the base and one each
through the ends of the 250mm uprights into the edges of the 225mm section
Now the 'L' shape is taking shape the last two sections to be fitted are the
top and inside L filler part. The 450mm filler should be the last upright to
complete the vertical part of the 'L' shape. This should be fitted so that
it is lever withe the top edges of the existing three uprights then screwed
in place via two screws each through the 700mm front and back uprights into
the edges of the 450mm filler. Last the top should now fit exactly over the
top edges of the four uprights and should be screwed into these.
Only the removeable inspecion panel is left. This should also fit fairly
exactly over the top of the lower 'L' section completely eclosing the nest
chamber. To secure this in place no a small approx 100mm wide section should
be screwed to the lower side of the panel, along one of the 300mm edges,
centered (as it will be 250mm wide) so that about 50mm of the width is
protruding out past the edge of the inspection hatch. The hatch can now be
placed in position so that this 50mm protrusion fits underneath the lower
edge of the 450mm filler and secures the hatch in place.
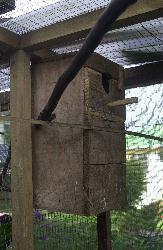
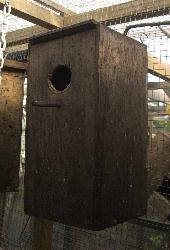
The two leftmost iamges below show two L shaped nestboxes, both have entrance
holes in the upper front panel and are secured in a reverse L position.
The nestbox could be mounted in either orientation depending on where the entrance hole is located. To allow mounting in either way the hole could be in the
upper 450mm filler section instead of either of the 700mm side uprights.
The vertical hollow log nestbox |
Nestbox with down-hinged front |
Nestbox with hinged top |
long L shape nestbox |
short L shape nestbox |

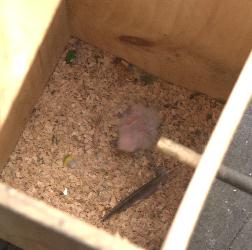
flip top nestbox with hatchling inside |
Perches
These are essential items for the cage or aviary.
Most new cages will come with a perch or two (or more), usually nothing more
than a length of wood dowelling with slots cut in each end for placing over
the cage bars. Sometime cheaper moulded plastic is used.
These are perfectly aedquate but quite boring for the bird.
More natuaral perches made from tree branches are easier to install in larger
cages and aviaries and are also easy to deisgn and make.
Perches can be made from almost anything as long as the bird can get a grasp
with its feet and relax or snooze/sleep while on the perch.
Wood is the best material to use although not treated, painted, polished or
otherwise preserved wood of any type. Lories will enjoy chewing and licking
perches so anything likely to injure or sicken the lory must be avoided.
Metal rods, shiny plastic rods, plastic covered cables such as old electic
cables, clotheslines of the plastic covered cord or wire type, common
multistrand galvanised wire, fencing wire and generally wire of all types are
NOT suitable to make a perch. They will tend to be too insecure,
endanger the bird if it can chew off and consume any of the material, and
be of too small a diameter for the bird to grasp and perch on. Wire may
also present a danger in that the bird may not see it and injure itself
when flying.
Some perches are made from abrasive materials and these serve the additional
purpose of keeping a bird's toenails from growing too long. These can be
quite simple and consist of nothing more than sandpaper wrapped around and
pinned to a plastic or wood dowel.
Some specially designed perches are made from a hard plastic moulded to
provide an adrasive surface or made from an abrasive stone material such as
pumice. These will tend to wear away in time and need replacing.
Tee tree wood perches |
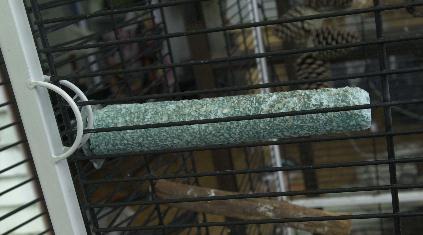
Perch made from abrasive material |
Sometimes in larger aviaries instead of placing many separate perches a tree
limb with many branches complete with leaves is used instead.
This is probably the most natural way of providing perches with
the additional advantage of providing great excitement for the birds who will
enjoy playing in and stripping the foilage.
No matter what size of large cage or aviary is used, the occasional tree
limb (of a suitable size) is an excellent addition, removed once stripped
and the wood dried up.
Making Perches
Making perches is real easy, something that anyone can do at just about
negligible cost. The lory will enjoy something different as perches can be
renewed on a regular basis.
If trees are available then simply use branches that have been pruned, usually
in every neighbourhood there will be trees that have been removed or pruned
back making potential perch material easily available.
In selecting a branch discard rotten or bug infested parts and sections
with lichens or other parasitic plants. Growing buds and smaller offshoot
branches need not be removed but the branch should be generally clean. It may
be an idea to wash it down with a brush to remove any pollution or possible
sprays used on the tree - especially with fruit trees. If there is leaking
sticky sap deposits then these can be left if not too large. Larger deposits
should be removed as the lory could get it's feet stuck or plumage
damaged.
Green or freshly cut wood should be used - ie where sap is still fresh, rather
than dried up wood removed some time before and the bark has become dry and
hard. Green wood will be softer and more enjoyable for the lory to strip.
Measure the length of perch needed and neatly cut the ends. If the diameter
of the perch enables it to fit through the cage wire easily then make the perch
long enough to slightly protrude at each end. It can then be secured by
simply using clothes pegs or more permanently by drilling small holes through
each end and inserting a nail to prevent it slipping back into the cage or
aviary.
For larger diameter perches the ends can be cut flat to fit inside the aviary
between the wire sides. These should then be attached to the wire using
a screw from outside the aviary through a large metal washer (or make one from
a piece of flat wood/plywood etc.), that is larger than the cage/aviary wire
mesh size. The screws goes into each end of the perch, holes may need to be
drilled into the perch ends to prevent the perch splitting as the screw is
tightened. This will make the perch very secure.
Jamming a perch between avaiary wire is not a good idea as it may
stretch the wire and at worst collapse when a bird lands on it.
Make perches from all different diameters of material, leave smaller
twigs attached to larger branches, even the very tiny ones as often a lory
will hang off these even though they bend under the lory's weight.
the same applies to foilage, do not strip this off, let the lory have the fun
of doing this as this will keep them occupied for hours on end.
Some of the more interesting trees and bushes that can provide wood for
perches are listed below.
The branches from fruit tree and bushes are a favourite with lories as
they will often spend much time stipping the bark away and sometimes munching
the bark to a fine pulp to extract the juice then tuck the juice into
their plumage (anointing).
The buds on fruit tree perches are a special
delight and lories just love slowly stripping and chewing these.
Almost all fruit trees and bushes are suitable, and the following have been
used with great success, Apple, Pear, Peach, Plum, Nectarine, Orange, Lemon,
Grapefruit, Feijoa and Guava.
Although fruit trees provide the best wood for perches others are also suitable.
Eucalytus and Camphor tree branches will also be stripped by the lory and are
treated just like fruit tree branches, sometimes also anointing their plumage
and feet.
Various pine and fir trees have branches with a rough texture that make
interesting perches for birds. Very often needles (leaves) grow directly from
the branch and there will be blobs of thick pungent pine sap either soft or
ome lories appear to really enjoy this type of tree perch and a few will even
enjoy the strong smelling sap although none will actually ingest it.
Bamboo is considered by some as unsuitable for bird perches because it
tends to be smooth and slippery and birds have difficulty landing on it or
retaining their grip. The opposite can be true in that lories will have great
fun with bamboo and will actually enjoy pulling apart and stripping lengths of
green bamboo and the growing pointed tips of bamboo. If leaves are left on the
bamboo segment joints then these will often be pulled apart and chewed.
Watching a lory learn about bamboo and how to land on it is quite amusing. It
will rarely get hurt by misjudging how slippery the bamboo is and soon learns
a quick grip technique for holding on. One lory actually learned to land at
speed on a bamboo perch but instead of trying to stop quickly it gripped to
perch and simply spun around in a full circle to loose momentum and came to
rest upright on the bamboo perch. Very soon other birds in the same aviary were
learning this technique much to the amusement of the humans observing the
action.
Almost any other tree wood is suitable for perch making, willows, elms,
chesnut, oak etc.. or whatever is available. Look for the unusual although
bushes that grow spikes or thorns should be avoided unless all of these are
removed.
Most pet stores will sell a variety of perches ranging from the simple lengths of dowelling to those specially designed to wear down toenails. These are
convenient and will often come with the necessary hardware to attach them to the
cage or aviary. The main disadvantage is of course the cost as some can be quite
expensive especially those made from more exotic materials.
When placing branches in an aviary place them in every direction including
vertically and at all sorts of angles. A few horizontal perches are ok but
branches in every direction are fun for the lory as it will explore every
walkable surface - they will even hang upside down from perches and the
aviary/cage roof!
Allow perches to run alongside food dishes, just outside nestboxes and close
to other areas where the lory can hide or sleep. Criss-crossing perches and
ones that touch each other or run below or to the side of each other are
excellent and lories will establish pathways along and around different perches
to reach various areas of the aviary. Leading a perch up to a tube or as a jump
off point to a toy (swing or rope etc..) makes interesting alternates to
always having to fly to a particular place.
Toys
Toys are another essential item for any lory cage or Aviary. These can provide
hours of endless fun for the captive lory and help ensure that boredom and
stress does not become a problem.
The most simple toys are ropes, cords, plastic and metal chains that can hang
from the cage/aviary roof, a knotted rope with ends left unsealed is a
particular delight for lories as they will spend hours unravelling the rope
right down to the individual strands. Reknotting these starts the whole
exercise again.
Swings made from wood, metal, rope, chain, etc., again a fun item for the lory
as swinging seems to a nice relaxation.
Places to run through and hide in, such as plastic tubes, wooden tunnels,
old wood boxes, plastic bottles with an end cut off, etc., items such as
these are especailly neat in an aviary where there are several birds as all
sorts of chasing and hiding games take place. Smaller lorikeets such as
Musks spend endless hours squabbling inside plastic tubes or play defending
hiding places.
An old tee shirt or wooly jumper hanging from a perch or from the roof is
somewhere lories can get inside and explore or sometimes just sleep in.
More complicated toys can range from climbing frames such as ladders, suspended
blocks of wood with many appendages, bells, chimes, plastic wheels and balls
etc., some lories are fascinated with the noise of small bells inside plastic
balls, the sound of wooden wind chimes, and anything that makes an unusual
sound. very often they will eventaully mimic these sounds.
Making suitable toys is quite straightforward, the most simple is the knotted
rope and one that provides a lot of fun and a suitable squabbling-over platform
if there are several birds in one aviary (especially musks and/or scalies).
Swings can be made from a variety of materials, they usually have one or more
horizontal bars supended in some way from the roof so that it can swing quite
easily. Try rope/cord swings, old wire coathangers reshaped to a swing.
A hanging wood block toy, simple a knotted rope with an oddshape piece of
wood threaded on above each knot, try short sections of fruit tree branch or
pine cones, opened and closed, threaded on rope along with old keys and
washers, these all make excellent activity toys.
http://www.birdsnways.com/birds/ideas.htm for more ideas on making bird toys
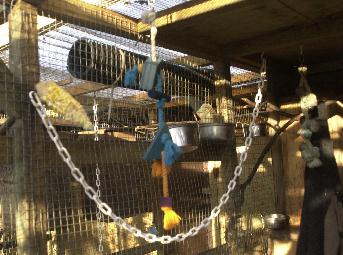
Rope and wood toy, various chains, plastic pipe |
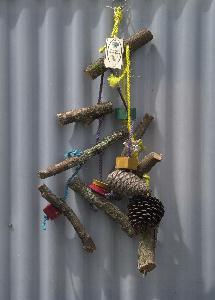
interesting toy |
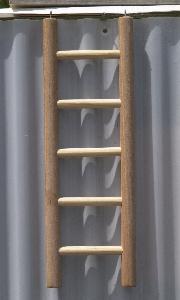
Wood ladder |
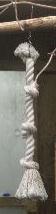
Knotted rope |
Red-collars playing |
Blue-streak on rope toy |
Transport cages
These are specialised cages designed for a specific purpose.
If you need to transport a bird then sending a full size cage is usually not
practical or economical. Usually a bird should be in a small transport cage for no more than a day.
Below are pictures of two small transport type cages, the larger is a home made
type with a wire mesh front and is substantial enough for couriering birds
overnight. It has enough room for two birds with sufficient food and water.
The second is a smaller commercial type and is a short distance transport
cage more suitable for taking birds to visit the vet or moving to other
aviaries no more than an hours distance away.
Both cages are small enough so that the bird will not attempt to fly.
Bird transportation cages. |

Brooders and Hospital cages
Hospital cages in common with brooder boxes/cages are usually a sealed
container in which the temperature and humidity can be controlled.
Since keeping a developing or sick bird at the
correct temperature this type of cage is essential for the aviculturist as at
some time or another it will be necessary to hand raise a baby bird or treat
a sick bird.
Many commercial designs are available and they come with a variety of features
The more modern types tend to be manufactured from plastic and are easily
taken apart for cleaning. Older types are often made from wood and glass.
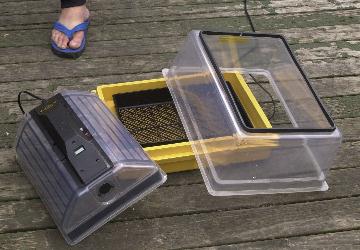
Pictured below are two examples, one on the left by Brinsea is about
300mm by 200mm by 150mm high and has the heater/fan/thermostat module in a
removable top cover.
Brinsea incubators
There is a small lcd digital thermometer and a temperature adjustment control
in this top cover.
It is constructed from plastic with two layers separated
by an air gap to provide insulation. The bottom tray, sidewalls section and
top cover separate for easy cleaning. It is provided with a plastic grid
tray cover. Overall lightweight and functional the model shown did not come
with the optional humidity controller which attaches to the side of the unit.
Available in several sizes, this particular size unit is ideal for up to
four baby lories (at about the same age).
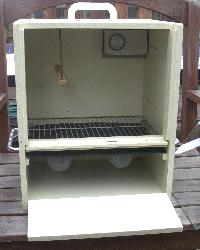
Shown on the right is an older but equally effective hospital cage made from
painted wood with a removable glass front. There is the main bird compartment
at the top and underneath a smaller compartment where there are two 40 watt
incadescent light bulbs used as a heating source. Heat from these is
transferred via a sheet of black painted aluminum
that separates the upper and lower compartments.
An adjustable thermostat inside this compartment
measures temperature and controls power to the light bulbs. Two bulbs are
use to minimise problems in the event of one failing.
An additional thermometer and humidity meter are normally kept inside the
bird compartment and if needed a small jar of water with a fine wire net lid
is included to increase humidity. This additional thermometer is needed as
the thermostat settings are only accurate to within a few degrees C.
With inside dimensions of 300mm by 200mm by 150mm this hospital cage allows up
to four baby lories to be raised from about 8 days old.
Both of these units are also ideal as hospital cages where it is essential
to provide a controlled heat/humidity environment for a sick bird.
Brinsea parrot rearing module |
Brinsea in parts |
Hospital cage - Note bulbs below |
Contact us
If you would like to contact
The Lory-Link please send email to Kellie Stewart
(arawa.aviaries@xtra.co.nz)
If you are in New Zealand and would like to find out more about meetings and
subscribing to the Lory-Link newsletter then you can phone Kellie on
AUCKLAND (9) 827-3604 or Fax AUCKLAND (9) 358-0059
.
Tile pattern: Cinnamon mutation Scaly-breasted lorikeet.
Last modified: 19 May 2002.